Care Guide: Planting, Soil & Watering
Overview: Dahlias grow best in full sun with rich, fertile, well-draining soil that holds moisture without ever becoming waterlogged. They enjoy steady, moderate watering through the warm growing season, but the tubers must be kept on the drier side early on and while dormant to prevent rot.
Quick Care Requirements
| Requirement |
Ideal Condition |
| Planting Season |
Spring, after the last frost once the soil has warmed (mid-spring in colder areas) |
| Growth Rate |
Moderate |
| Soil Type |
Rich, fertile, well-draining loam |
| Water Need |
Moderate — keep evenly moist in growth, but let the surface dry between waterings to avoid tuber rot |
Planting & Establishment
- Best Planting Season: Plant tubers in spring once all danger of frost has passed and the soil has warmed; in colder regions wait until mid-spring, and lift and store the tubers over winter where the ground freezes.
- How to Plant:
- Hole Preparation: Dig a planting hole about 10–15 cm deep and wide enough to lay the tuber on its side comfortably.
- Soil Amendments: Work in plenty of compost or well-rotted organic matter to enrich the bed and improve drainage; avoid heavy nitrogen, which drives leafy growth at the expense of flowers.
- Planting Depth: Set the tuber horizontally roughly 10–15 cm deep with the growing eye facing up, so the crown sits just below the surface — do not bury the emerging stem.
- Growth Speed & Expectations: Expect a moderate pace of growth, with plants filling out and starting to flower within a few months under warm, sunny conditions.
Soil, Watering & Drainage Care
- Soil Mix & Drainage Needs: Provide light, aerated, well-draining soil; in containers use a quality free-draining potting mix rather than heavy garden soil, and make sure excess water can escape freely, since waterlogged ground quickly rots the tubers.
- Watering Schedule & Technique:
- Young / Newly Planted: Water sparingly right after planting until shoots appear — overwatering dormant tubers is the main cause of rot — then water regularly as growth takes off.
- Established: Water deeply two to three times a week in warm weather, letting the top few centimetres dry before watering again.
- Seasonal Adjustments: Increase watering during hot, dry spells and ease off as growth slows; keep the tubers dry through winter dormancy.
Growing in Pots, Balconies & Indoors
Dahlias are showy, tuberous summer-flowering plants (about 0.3-1.5 m tall, sometimes more) – not houseplants, but first-rate container plants for a sunny balcony or patio. Indoors the light is far too weak for them to bloom, so grow them outdoors in strong sun and, in cold climates, overwinter the dormant tubers under cover.
Quick Details
- Container Size: A large, deep pot (roughly 10-30 L / 2.5-8 gal) to support the tubers and top growth
- Indoor Suitability: Not an indoor houseplant – it needs strong outdoor light to flower
- Best Spot: Full sun, outdoors
- Soil & Drainage: Free-draining, organic-rich mix – potting mix or peat with perlite or vermiculite
- Watering in Pots: Average water; keep evenly moist but never waterlogged – tubers rot in standing water
Indoors & On the Windowsill
- Houseplant limits: The grower confirms dahlias are not indoor houseplants – they need strong outdoor light to bloom.
- Overwintering indoors: This is the main reason to bring them under cover. After the top dies back, lift the tubers (or move the whole pot) and store them cool, dry and frost-free while dormant, then restart them in the warm season.
On a Balcony or Patio
- Light & wind: Give the sunniest spot. Taller varieties grow top-heavy in bloom, so stake them and shelter from strong wind. Walls and paving reflect heat and pots dry fast – check moisture often.
Choosing the Pot, Soil & Long-Term Care
- Pot & drainage: A large, deep pot with strong drainage holes; skip a standing-water saucer to protect the tubers from rot.
- Potting mix: Free-draining and organic-rich – potting mix or peat with perlite or vermiculite.
- Feeding: Container dahlias need regular feeding as nutrients leach; a bloom-type (lower-nitrogen) feed supports flowering.
- Tubers & repotting: Each dormant season lift and divide the tubers, then restart them in fresh mix in a large pot.
Bloom & Edible Flower Guide
Quick Details
- Bloom Season: Spring through summer into autumn, until the first frosts
- Time to First Bloom: The same season – tubers planted after the last frost flower from mid-summer on
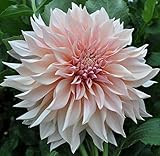
- Flower Appearance: Fringed (fimbriata) double flowers, pink with a yellow centre, the petals finely split and slightly curled like shredded paper
- Edibility: The petals are edible, with a mild flavour, and make a pretty garnish
Detailed Blooming Overview
This is a fringed, or fimbriata, dahlia – its many petals are finely cut and slightly curled at the tips, giving each pink-and-yellow bloom a soft, feathery look. Dahlias are among the longest-flowering plants of the border, blooming from mid-summer until frost if kept deadheaded. The petals are edible and mildly flavoured, nice scattered over a dish. In cold climates the tubers are lifted and stored over winter, then replanted after the last frost.
Flower Characteristics
- Double flowers with many narrow, fringed petals, pink with a yellow centre.
- Petals finely split and lightly curled, like shredded paper.
- Excellent as a cut flower and long-lasting on the plant.
Bloom Care & Thinning
- Deadheading: Removing spent flowers regularly is the single best way to keep a dahlia blooming until frost.
- Disbudding: Removing the two side buds beside each main bud gives larger, show-quality flowers.
- Overwintering: In cold zones, lift and store the tubers after the first frost and replant in spring.
Bloom Health & Protection
- Earwigs and beetles on the blooms: They chew petals at night; trapping earwigs in rolled cardboard or straw-stuffed pots and clearing debris usually keeps damage down.
- Powdery mildew and grey mould (Botrytis) on buds: Common in crowded, damp late-season growth; better spacing and airflow help, with a suitable fungicide only if it takes hold.
Pruning, Training & Seasonal Maintenance
Dahlia nenekazi is an herbaceous tuberous perennial in the fimbriated group, its pink-and-yellow petals split into narrow, curling, needle-like segments for a light, airy head rather than a dense one. Like every dahlia it carries no persistent wood, so pruning means pinching young growth, deadheading through the season and one full cut-back at the end of it, and the plant tolerates that cut-back completely. The most useful periods to work are spread through spring to autumn for pinching and deadheading, with the hard cut coming once flowering is over.
Quick Pruning & Maintenance Specs
| Pruning Tolerance |
Moderate (annual top growth only) |
| Primary Pruning Window |
Spring-autumn, ongoing (pinching and deadheading) |
| Secondary Maintenance Window |
Autumn/winter end-of-season cut-back (recorded pruning season: Winter) |
| Typical Frequency |
Deadhead weekly in bloom; one hard cut-back at season end |
| Main Objective |
Maximize the long bicolor bloom run and prepare the tuber for dormancy/lifting |
| Young Plant Priority |
Pinch the main shoot early to build a bushy, multi-stemmed plant |
| Mature Plant Priority |
Frequent deadheading; light staking (fimbriated heads are light) |
| Best Tool Type |
Precision snips / bypass secateurs |
| Avoid Heavy Pruning During |
Before foliage yellows or blackens with frost if the tuber will be lifted |
Pruning by Plant Age & Size
Newly Established
Leave alone beyond removing damaged shoots so the plant can build leaf area to feed the tuber.
Young / Formative
Pinch the growing tip after 2-3 leaf pairs to multiply flowering stems – there is no framework to train, only branch number to encourage.
Mature / Established
Deadhead continuously; light staking is usually enough given the modest weight of fimbriated blooms, mainly to prevent wind rock as the plant reaches its full 0.3-1.5 m height.
Seasonal Pruning Schedule
Summer Canopy Management
Objective: sustain bloom. Remove spent flower stems to the next leaf node; leave healthy foliage and round developing buds alone. Response: more branching, continued flowering. Flowering impact: deadheading directly extends the season’s bloom count.
Dormant/Winter
Objective: close down for the season. Cut stems down once frost blackens the foliage or bloom ends in warm climates; lift and cure the tuber where winters are cold, or simply clear the dead flowers and leaves where it overwinters in the ground.
Structural Pruning & Training
No wood to shape; the only real decisions are pinching for branch count and light support for the airy fimbriated heads.
Special Growth to Remove
- Spent flower stems, cut to the next leaf pair or side bud.
- Yellowing or damaged leaves.
- All top growth at the season-end cut-back.
Container & Small-Space Pruning
Pinch a little harder early in pot culture to keep growth compact, and stake even the lighter stems since containers tip more readily than open ground. Divide the tuber clump at repotting/lifting.
Tools
- Precision snips or bypass secateurs for deadheading and pinching.
- Soft ties or light stakes for support.
Tool Hygiene & Disease Risk
Increased risk: dahlia viruses transmit on sap-coated blades, so wipe tools clean between plants when deadheading more than one cultivar in a session.
Cut Placement & Technique
Deadhead just above the next leaf node or side shoot; cut vase stems cleanly above a node.
Heavy Pruning & Rejuvenation
The annual end-of-season removal of all top growth is routine and fully tolerated, since the tuber sends up fresh growth the next season.
Post-Pruning Care
After the cut-back, lift, dry and store the tuber cool, dark and dry in cold climates, or keep the bed drier over winter in mild ones – it is prone to rot if kept wet. No feeding after the hard cut-back.
Common Pruning Mistakes
- Removing round developing buds by mistake for finished, pointed spent blooms.
- Cutting back green foliage too early, before the tuber finishes storing energy.
- Not disinfecting tools between dahlia cultivars.
When NOT to Prune
Do not remove healthy foliage during active bloom beyond deadheading. Do not cut top growth back before frost or foliage yellowing if the tuber is to be lifted. Avoid cutting in wet conditions – the crown is prone to rot.
Recommended Tools (by task)
- precision_snips – light, clean deadheading of the fimbriated blooms’ slender stems.
- soft_ties_stakes – modest support against wind rock.
- blade_disinfectant – limiting sap-borne virus spread between dahlia cultivars.
Pests, Diseases & Troubleshooting
Overview: Dahlias are tuberous, soft-stemmed perennials whose lush growth and long display of nectar-rich, high-petal-count blooms make them a magnet for chewing and sap-sucking pests — slugs and earwigs on the foliage and flowers, and aphids and thrips that also spread viruses. The plants themselves are not especially disease-prone in the garden, but tubers rot readily in cold, wet ground or poor winter storage. Management is cultural first: healthy, well-spaced plants in full sun with good airflow, vigilant slug and earwig trapping, strict aphid control to block virus spread, and careful lifting and dry storage of tubers.
Quick Troubleshooting Overview
| Issue / Pest |
Main Symptom |
Primary Solution |
| Slugs & snails |
Young shoots and leaves shredded overnight; slime trails |
Trap and barrier around emerging shoots; hand-pick after dark |
| Earwigs |
Ragged holes chewed in petals and leaves, worst on open blooms |
Upturned straw-filled pot traps; empty daily |
| Aphids |
Sticky honeydew, curled shoot tips, sooty mould; spread virus |
Blast off, encourage predators, insecticidal soap if heavy |
| Thrips |
Silvery flecking, distorted buds; can transmit spotted wilt |
Blue sticky traps, remove weeds, soap or oil sprays |
| Powdery mildew |
White powdery coating on late-season leaves |
Improve airflow and spacing; sulphur or potassium-bicarbonate spray |
| Tuber rot |
Soft, mouldy or blackened tubers in wet soil or storage |
Sharp drainage; lift, dry and store cool, dry and frost-free |
Common Pests & Management
- Slugs & snails (Deroceras reticulatum, Cornu aspersum):
- Symptoms: The number-one enemy of young dahlias. Soft emerging shoots and new leaves are grazed to stumps overnight, with irregular holes and tell-tale silvery slime trails; whole newly sprouted plants can vanish. Damage is worst in mild, damp conditions.
- Prevention & Control: Protect the vulnerable shoot stage above all — clear leaf litter and hiding places, water in the morning so surfaces dry by night, and ring emerging shoots with a barrier of sharp grit, crushed shell or diatomaceous earth. Hand-pick after dark, set beer traps, and encourage ground beetles, frogs and birds. Where pressure is high, use ferric-phosphate slug pellets, which are safe around wildlife and pets.
- Earwigs (Forficula auricularia):
- Symptoms: The signature dahlia pest. They feed at night, chewing ragged holes in petals and young leaves and hollowing flower centres, then hide deep in the blooms by day. Damage is easily confused with caterpillar or slug feeding, so check for the insects themselves inside flowers and stems.
- Prevention & Control: Trap them — invert straw-stuffed flowerpots or roll damp newspaper on canes among the plants, then collect and dispose of the earwigs each morning. Keep the base clear of debris. Earwigs also eat aphids, so trap-and-remove rather than blanket spraying keeps that benefit; reserve any targeted insecticide for severe outbreaks.
- Aphids (Myzus persicae and others):
- Symptoms: Clusters of green, black or peach aphids on soft shoot tips, buds and leaf undersides, causing distortion, sticky honeydew and black sooty mould. Most seriously, they are the main vectors of dahlia mosaic and other viruses, so even light infestations matter.
- Prevention & Control: Inspect growing tips regularly and act early. Dislodge colonies with a jet of water, squash by hand, and encourage ladybirds, lacewings and hoverflies by avoiding broad-spectrum sprays. For persistent infestations use insecticidal soap or horticultural oil, spraying in the evening to protect pollinators. Controlling aphids is the single best way to limit virus spread.
- Thrips (Frankliniella occidentalis):
- Symptoms: Tiny slender insects that rasp leaves and petals, leaving silvery streaks, pale flecking and distorted, discoloured buds. Western flower thrips is also a vector of tomato spotted wilt virus, adding a disease dimension to the feeding damage.
- Prevention & Control: Keep the plot weed-free, since weeds harbour both thrips and the viruses they carry. Hang blue sticky traps to monitor and reduce numbers, and encourage predatory mites and lacewings. Treat build-ups with insecticidal soap or horticultural oil, covering leaf undersides and flower crevices where thrips shelter.
- Capsid bugs (Lygocoris pabulinus):
- Symptoms: Sap-feeding on shoot tips and buds injects a toxin that kills small patches of tissue; as leaves expand these become many small ragged holes with puckered, distorted growth, and buds may be blind or produce lop-sided flowers. The bugs are fast-moving and often gone by the time damage shows.
- Prevention & Control: Tidy winter shelter by clearing debris and weeds, and tolerate minor damage, which is largely cosmetic. Encourage general predators. Only where capsids are consistently ruining buds is an evening insecticide spray of the growing tips justified.
- Two-spotted spider mite (Tetranychus urticae):
- Symptoms: A hot, dry-weather and greenhouse problem. Leaves develop fine pale stippling, then bronze, dry and drop, and in bad cases fine webbing appears on undersides and shoot tips. Look for the tiny moving mites with a hand lens.
- Prevention & Control: Mites thrive in dry, dusty conditions, so keep plants well watered and raise humidity where practical; hose down foliage to knock back numbers. Encourage predatory mites and other natural enemies. Treat with insecticidal soap or horticultural oil, targeting leaf undersides and repeating as needed.
- Caterpillars & cutworms (Agrotis spp. and other moths):
- Symptoms: Caterpillars chew irregular holes in leaves, buds and petals, while soil-dwelling cutworms sever young stems at ground level overnight, felling whole shoots. Look for droppings, chewed edges and the larvae hiding on undersides or just below the soil.
- Prevention & Control: Hand-pick caterpillars and cutworms in the evening, hoe soil around plants to expose cutworms to birds, and protect young shoots with collars if needed. Encourage birds and parasitic wasps. Biological Bacillus thuringiensis (Bt) or a targeted product controls heavy caterpillar attacks without harming beneficials.
Diseases & Fungal Issues
- Powdery mildew (Golovinomyces cichoracearum):
- Symptoms: A classic late-season disease. A white to greyish powdery coating spreads over the upper leaf surfaces, which may yellow and dry; it is favoured by crowding, dry roots and cool nights with warm days, and rarely kills the plant but weakens it and spoils appearance.
- Treatment & Management: Space plants for good airflow, avoid drought stress by watering the roots (not the foliage), and remove and dispose of the worst leaves. At first signs apply a sulphur or potassium-bicarbonate spray, repeating as directed; clear infected debris at the end of the season.
- Grey mould (Botrytis cinerea):
- Symptoms: Fuzzy grey-brown mould on ageing or rain-damaged blooms and buds, which rot and collapse; petals brown and stick together in wet, still weather, and the mould can spread down into stems. It also attacks stored tubers.
- Treatment & Management: Sanitation is everything: promptly deadhead spent and damaged flowers, remove rotting material, and improve airflow and spacing. Avoid overhead watering late in the day. Fungicides are rarely needed in the garden if hygiene is good; focus on dry, airy conditions.
- Dahlia mosaic & tomato spotted wilt viruses (Dahlia mosaic virus; Tomato spotted wilt orthotospovirus):
- Symptoms: Yellow mosaic mottling, pale vein-banding, stunting and puckered or distorted leaves point to dahlia mosaic virus; ring spots, bronzing and dead flecks suggest spotted wilt. Both are incurable and are carried in tubers and spread by aphids (mosaic) and thrips (spotted wilt).
- Treatment & Management: There is no cure — dig up and destroy clearly virused plants and never propagate from them. The real control is prevention: rigorous aphid and thrips management, weed control, tool hygiene, and starting from clean, healthy tuber stock.
- Verticillium & Fusarium wilt (Verticillium dahliae, Fusarium oxysporum):
- Symptoms: Soil-borne fungi that invade the water-conducting tissue, causing leaves to yellow and wilt — often one side or lower part first — followed by collapse; cut stems may show brown internal streaking. Verticillium dahliae is literally named for this host.
- Treatment & Management: There is no chemical cure. Remove and destroy affected plants and tubers, avoid replanting dahlias in the same infected ground, and improve drainage. Practise crop rotation, use clean stock, and keep plants unstressed and well fed to resist infection.
- Tuber storage rots (Botrytis, Fusarium, bacterial soft rot Pectobacterium):
- Symptoms: Lifted tubers turn soft, mushy, mouldy or foul-smelling in storage, or shrivel and dry out if kept too warm; damaged or diseased tubers rot first and can spread to sound ones.
- Treatment & Management: Lift after the first frost blackens the foliage, cure the tubers to dry the skins, and discard any damaged or diseased. Store in barely-moist vermiculite, sand or wood shavings somewhere cool, dark and frost-free with gentle air movement; inspect through the winter and remove any starting to rot.
Growing Difficulties & Abiotic Problems
- Tuber rot in cold, wet soil:
- Cause & Symptoms: Dahlia tubers are frost-tender and rot in waterlogged, cold ground; planted too early or left in heavy wet soil over winter, they turn soft and fail to sprout.
- Correction Strategy: Plant only once the soil has warmed and frost has passed, into free-draining soil improved with organic matter, or start tubers under cover. In cold-winter areas lift and store tubers dry; in mild areas mulch heavily over the crowns.
- Frost blackening:
- Cause & Symptoms: Dahlias are not frost-hardy above ground; the first autumn frost turns the foliage black and mushy overnight, and an unexpected spring frost will cut down young shoots.
- Correction Strategy: Do not plant out until all danger of frost is over, and protect early shoots with fleece if a late frost threatens. Treat the first autumn frost as the signal to cut back and lift tubers for storage.
- Failure to bloom / all leaf and no flower:
- Cause & Symptoms: Lush leafy growth with few or no flowers usually means too much nitrogen or too little sun; dahlias need full sun and a feed higher in potassium to flower well. Deep shade also gives weak, floppy, non-flowering plants.
- Correction Strategy: Grow in full sun, avoid high-nitrogen feeds once established and switch to a high-potassium (tomato-type) feed as buds form, and deadhead regularly to keep bloom coming.
- Weak stems, toppling & disbudding needs:
- Cause & Symptoms: The tall, brittle, hollow stems and heavy blooms are easily snapped by wind or the weight of large flowers, and un-pinched plants give many small blooms on lax stems rather than fewer strong ones.
- Correction Strategy: Stake at planting so canes are in before growth fills out, tie in as stems lengthen, and pinch out the growing tip early to build a bushy, self-supporting plant. For large exhibition blooms, disbud the side buds to channel energy into the terminal flower.
What Helps — Products & Tools
For dahlias the core toolkit is: slug and snail defences (sharp grit or diatomaceous-earth barriers, beer traps, and wildlife-safe ferric-phosphate pellets); earwig traps (straw-filled upturned pots on canes); blue sticky traps for thrips; insecticidal soap and horticultural or neem oil for aphids, thrips and mites (applied in the evening to protect pollinators); Bacillus thuringiensis (Bt) for caterpillars; sulphur or potassium-bicarbonate spray for powdery mildew; and, for over-wintering, dry storage media such as vermiculite, sand or wood shavings plus sturdy stakes and ties. Cultural and biological measures come first; reach for sprays only when monitoring shows they are needed.
Propagation Guide
Dahlia nenekazi, a fimbriated-flowered dahlia with fringed, needle-like pink and yellow petals, is propagated almost entirely by dividing its cluster of tuberous roots, since this keeps the fringed flower form and coloring identical to the parent plant. Seed-grown dahlias are hybrid in origin and will not come true to this cultivar, so vegetative propagation is essentially required if you want to reproduce "nenekazi" specifically; tuber division itself is an easy, beginner-friendly technique.
Quick Propagation Specs
| Best Propagation Method |
Tuber (clump) division |
| Alternative Methods |
Basal stem cuttings from sprouted tubers; seed (for breeding/species work only) |
| Propagation Difficulty |
Easy |
| Seed True-to-Type |
No – hybrid offspring vary and will not match this cultivar |
| Vegetative True-to-Type |
Yes |
| Best Propagation Season |
Spring, after tubers have overwintered in storage (cold climates) or in mid-spring where planted directly (zones 8–11) |
| Cutting Rooting Time |
Typically a few weeks under warm, humid conditions |
| Germination Temperature |
Roughly 18–24°C / 64–75°F for seed of the species |
| Seed Sowing Depth |
Shallow, about 0.5cm / ¼in, barely covered |
Growing from Seed
Dahlia seed germinates fairly readily in warm conditions, usually within one to two weeks, but because named cultivars like this one are complex hybrids, seedlings will show variable flower color, form and petal fringing rather than reproducing "nenekazi" itself. Seed is therefore best reserved for breeding or growing species-type dahlias, not for gardeners who want an identical copy of this plant.
Stem Cuttings
Cutting Type
Basal shoot cuttings taken from tubers that have been started early (warmth and light) so they sprout new growth.
Best Timing
Late winter to early spring, once stored tubers have produced a few inches of new shoot growth.
Cutting Preparation
Cut a young basal shoot cleanly just above where it joins the tuber, leaving a small heel where possible.
Rooting Setup
Insert into a free-draining, moist propagation mix and keep warm and humid until roots form.
Rooting Hormone
Optional but can improve consistency, especially with woodier or older basal shoots.
Rooting Time
Usually within a few weeks under warm, humid conditions.
Rhizomes, Tubers, Bulbs & Corms
Tuber Division
Divide the clump of tuberous roots in spring, just before replanting, making sure each division retains a piece of the crown (neck) with at least one visible growth eye – the fleshy tuber itself carries no eyes, so a division without crown tissue will not sprout. In cold-hardiness areas outside zones 8–11, lift the whole clump after foliage is cut back at season's end, as the site notes, and store it over winter before dividing; watch for and discard any soft, rotten sections, since tuber rot is the main failure point for this method. Where winters are mild, division can be done directly in the ground in spring without lifting.