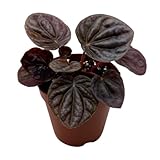
Care Guide: Planting, Soil & Watering
Overview: Peperomia puteolata (parallel peperomia) is a compact, semi-succulent evergreen grown mainly for its foliage, suited to warm frost-free gardens (hardiness zone 11+, or 10b with care) or as a houseplant elsewhere. It likes warmth (above about 16°C), bright indirect light, and a light, rich, well-drained mix kept lightly moist but never soggy.
Quick Care Requirements
| Requirement |
Ideal Condition |
| Planting Season |
Spring in zone 10a; spring–summer in 10b; spring–autumn in 11; year-round in 12+ |
| Growth Rate |
Slow |
| Soil Type |
Light, rich, well-draining and moisture-retentive (peat or potting mix with perlite) |
| Soil pH |
Slightly acidic (around 6.0) |
| Water Need |
Low to Moderate — keep lightly moist, let the surface dry, never soggy |
Planting & Establishment
- Best Planting Season: Plant in spring in zone 10a, spring–summer in 10b, spring–autumn in 11, and year-round in zone 12 and warmer; in cooler areas grow it under cover as a houseplant.
- How to Plant:
- Hole Preparation: Settle the plant into a pot or gap only about 30–50% larger than its root ball; a large volume of wet mix around small roots invites rot.
- Soil Amendments: Blend perlite into a peat- or potting-mix base for aeration, with some humus or organic matter for fertility.
- Planting Depth: Keep the crown at the surface of the mix and do not bury the fleshy stems; firm lightly and water in.
- Growth Speed & Expectations: Expect slow growth even in ideal conditions, so start with a well-grown plant for quicker impact.
Soil, Watering & Drainage Care
- Soil Mix & Drainage Needs: Use a light, airy, well-drained mix — peat or potting mix with perlite and a little organic matter — that holds slight moisture without staying wet. Sharp drainage is essential to prevent root and stem rot; in pots let the base drain fully and never leave the plant standing in water.
- Watering Schedule & Technique:
- Young / Newly Planted: After potting, water lightly and keep the mix just moist while new roots form; rain or clean water is best.
- Established: Water when the top of the mix begins to dry — keep it lightly moist but never soggy, and never leave it in standing water.
- Seasonal Adjustments: Water more often in warm, bright spells and much less in winter when growth slows.
Growing in Pots, Balconies & Indoors
Peperomia puteolata (parallel peperomia) is one of the grower’s recommended houseplants – a compact, slow-growing plant (about 10-25 cm / 4-10 in) that thrives in bright, indirect light indoors. It also makes a neat container plant for a shaded balcony, and it asks for little beyond steady moisture and humidity.
Quick Details
- Container Size: 10-15 L (2.6-4 gal); start in a pot about 30-50% larger than the plant
- Indoor Suitability: A genuine, easy houseplant – grows well indoors
- Best Spot: Bright shade with plenty of light but no harsh direct sun
- Soil & Drainage: Potting mix or peat with perlite plus humus/organic matter; must drain freely
- Watering in Pots: Keep lightly moist – a little water, never waterlogged; rain or clean water is best
Indoors & On the Windowsill
- A good houseplant: The grower rates it as growing well indoors. Keep the soil moist and the air humid, and shield it from the dry blasts of heating and air-conditioning units.
- Light & care: Give it good ambient light (an east/north window or set back from a bright one). Feed at least once a year.
- Windowsill growing: Happy on a bright sill out of scorching sun; its small size makes it ideal for sills and shelves.
On a Balcony or Patio
- Light & shelter: A shaded, sheltered spot suits it – direct sun and drying wind will scorch the foliage. Small pots dry fast near warm walls, so check moisture often.
- Practicalities: Light and easy to move indoors when nights turn cool – it is not frost-hardy.
Choosing the Pot, Soil & Long-Term Care
- Pot & drainage: A 10-15 L pot with good drainage holes; terracotta breathes and dries faster, glazed or plastic holds moisture longer. Avoid leaving it standing in water.
- Potting mix: Aerated and organic – potting mix or peat with perlite, blended with humus; a chopped mulch on top helps hold moisture.
- Feeding: Potted plants leach nutrients faster – feed at least once a year, more in active growth.
- Repotting: Refresh the soil every few years (best in the cool/rest season) – wash old soil off the roots, trim roots and prune the plant, then repot in fresh mix.
Grower’s Container Tip
- Soak-and-drain watering: Let the base of the pot fill with water, but make sure it dries out the same day – this waters thoroughly without leaving the roots sitting wet.
Bloom & Flower Guide
Quick Details
- Bloom Season: Spring into summer
- Flower Appearance: Slim greenish-white flower spikes shaped like a rat-tail or ice-pop, rising above the foliage
- Edibility: Ornamental – grown for its striped foliage; the flowers are insignificant
Detailed Blooming Overview
This is a foliage plant first and foremost, but in the warm months it sends up its own quiet flower show: narrow, greenish-white spikes packed with tiny flowers, held upright over the leaves like little ice-pops. They are more curiosity than spectacle, and the plant is harmless – a safe, non-toxic choice around pets.
Flower Characteristics
- Tiny flowers densely packed on slender upright spikes.
- Greenish-white; slim and tail-like in shape.
Bloom Care & Thinning
- Optional removal: Many growers simply snip the spikes off to keep the plant’s energy in its foliage.
- Non-toxic: Safe around cats and dogs.
Pruning, Training & Seasonal Maintenance
Peperomia puteolata (Parallel Peperomia, Radiator Plant) is a trailing, semi-succulent foliage houseplant that tolerates frequent light pruning; the objective is a full, bushy cascade rather than a few long bare-based trailers, and cutting back does not affect any fruit or flower crop – the thin, insignificant flower spikes are simply removed as they fade. Because it is slow growing but roots readily from cuttings, pruning can be done whenever a stem is thinning out or getting leggy, with light shaping year-round and a slightly more deliberate tidy after the spring/summer bloom.
Quick Pruning & Maintenance Specs
| Pruning Tolerance |
High for tip-pinching; Moderate for cutting back whole trailing stems |
| Primary Pruning Window |
Year-round, as needed |
| Typical Frequency |
Light pinching every few weeks; a fuller cutback once a year if stems have thinned |
| Main Objective |
Encourage branching and a dense cascade; remove bare, leggy trailers |
| Young Plant Priority |
Pinch early to establish multiple trailing stems from the base |
| Mature Plant Priority |
Cut back the oldest, most bare-based trails hard to renew fullness |
| Best Tool Type |
Precision snips |
| Avoid Heavy Pruning During |
Winter dormancy / low-light, low-growth periods |
Pruning by Plant Age & Size
Newly Established
Only remove damaged leaves at first; once new growth is underway, pinch the growing tips to encourage side-branching from the base rather than a single long trail.
Young / Formative
No structural training system applies – shape by pinching tips to multiply the number of trailing stems, which is what produces a full-looking hanging or cascading plant.
Mature / Established
Priority is renewal: as individual trails age they become bare toward the base with foliage only at the tips, so cut these back hard (they resprout readily from remaining nodes) rather than leaving the whole plant to thin out.
Seasonal Pruning Schedule
Ongoing Sanitary
Objective: keep the plant tidy and encourage bushiness. Remove dead/yellowing leaves and the thin, spent bloom stems as they finish; pinch soft tips periodically. Do not remove more than a third of the foliage at once. Expected response: quick new tip growth from the pinch point.
Special Growth to Remove
Dead leaves and spent bloom stems are the routine removal; bare, leggy trailing stems that have lost lower leaves should be cut back hard rather than left, since they will not fill back in on their own.
Container & Small-Space Pruning
As a compact hanging/tabletop plant, regular pinching keeps trails proportional to the pot; unlike an in-ground planting there is no spread to control, so pruning here is purely about fullness, not size containment.
Tools
Precision snips for pinching tips and cutting soft, semi-succulent stems – no saw or lopper is ever needed on this plant.
Tool Hygiene & Disease Risk
Routine – clean, sharp snips are sufficient; no significant pruning-transmitted disease risk is documented for this species.
Cut Placement & Technique
Pinch or cut just above a leaf node so the remaining stem has a point to branch from; when propagating, take the removed tip cuttings and root them to fill gaps or start new plants.
Heavy Pruning & Rejuvenation
Tolerated at the stem level: an individual bare trailing stem can be cut back hard to a few centimeters and will usually resprout from surviving nodes, but avoid cutting every stem back simultaneously so the plant is not left leafless.
Post-Pruning Care
Keep the soil evenly moist as usual after pinching or cutting back; no extra feeding is needed just because the plant was trimmed.
Common Pruning Mistakes
Never pinching, which leaves long bare trailing stems with foliage only at the tips; cutting back every stem hard at the same time instead of renewing a few at a time.
When NOT to Prune
Avoid heavy cutting back during winter low-light dormancy, when regrowth will be slow.
Recommended Tools (by task)
- precision_snips – pinching tips and cutting back bare trailing stems on this soft-stemmed foliage plant.
Pests, Diseases & Troubleshooting
Peperomias are compact, generally pest-tolerant houseplants whose real weakness is water management rather than insects. This is a semi-succulent, thick-leaved type, so it is especially prone to rot from overwatering and needs an even grittier, faster-draining mix. The genuine pests are mealybugs, spider mites, fungus gnats, whiteflies and occasional thrips or scale, while the important disorders are overwatering root rot, edema (corky leaf bumps), Cercospora leaf spot and Peperomia ringspot virus. Bright indirect light and a ‘dry-out-then-water’ routine keep them thriving.
Quick Troubleshooting Overview
| Issue / Pest |
Main Symptom |
Primary Solution |
| Mealybugs |
White cottony tufts in leaf axils and on stems |
Alcohol swab, insecticidal soap/oil, isolate plant |
| Spider mites |
Fine stippling, dull leaves, webbing in dry air |
Raise humidity, hose/wipe leaves, insecticidal soap/oil |
| Fungus gnats |
Small black flies around the pot, larvae in wet mix |
Let soil dry, use sticky traps and BTI drench |
| Root rot |
Wilting, mushy stems, blackened roots in wet soil |
Cut back watering, repot into airy mix, remove rot |
| Edema |
Corky raised bumps/scabs on leaf undersides |
Water more evenly, improve light and airflow |
| Leaf spot / ringspot |
Brown ringed spots or ring-shaped distortion |
Remove leaves; discard virus-infected plants |
Common Pests & Management
- Mealybugs (Pseudococcidae):
- Symptoms: White cottony masses tucked into leaf axils, stems and sometimes roots, with honeydew, stunting and leaf yellowing; the commonest peperomia pest.
- Prevention & Control: Isolate the plant, dab visible clusters with a 70% alcohol swab, then treat with insecticidal soap or horticultural oil weekly until clear; drench for root mealybugs and repot if needed.
- Spider mites (Tetranychidae):
- Symptoms: Fine pale stippling, dull or bronzed thick leaves and faint webbing, worst in dry indoor air.
- Prevention & Control: Raise humidity, wipe or hose the foliage, keep the plant from drying out, and treat persistent mites with insecticidal soap or horticultural oil.
- Fungus gnats (Sciaridae (Bradysia spp.)):
- Symptoms: Small dark flies drifting around the pot; their larvae feed in constantly wet mix and can nibble fine roots of seedlings.
- Prevention & Control: Let the top of the mix dry between waterings, use yellow sticky traps for adults, and drench with Bacillus thuringiensis israelensis (BTI) or apply a fine sand top-dressing for larvae.
- Whiteflies (Aleyrodidae):
- Symptoms: Tiny white flies that fly up when disturbed, with honeydew and yellow-flecked leaves; less common but seen in greenhouses.
- Prevention & Control: Monitor with yellow sticky traps, encourage parasitoids in greenhouses, and spray insecticidal soap or horticultural oil on the leaf undersides.
- Thrips and scale (Thysanoptera / Coccidae):
- Symptoms: Thrips cause silvery flecking and distorted new growth; scale appear as brown or waxy bumps on stems with honeydew.
- Prevention & Control: Use blue sticky traps for thrips, scrape off scale, and treat both with insecticidal soap, horticultural oil or spinosad for thrips, repeating to catch new stages.
Diseases & Fungal Issues
- Cercospora leaf spot (Cercospora spp.):
- Symptoms: Raised brown-to-black spots, often on leaf undersides, that enlarge and disfigure the foliage in warm, wet, crowded conditions.
- Treatment & Management: Avoid wetting the leaves, improve airflow and spacing, remove affected leaves, and apply a copper-based fungicide only if it spreads.
- Rhizoctonia / Pythium root and stem rot (Rhizoctonia solani / Pythium spp.):
- Symptoms: Blackened, collapsing stem bases and soft, discoloured roots in soggy mix—the most frequent fatal disease.
- Treatment & Management: Keep the mix airy and let it dry between waterings; remove rotted tissue, take healthy cuttings and repot into fresh, free-draining medium.
- Peperomia ringspot virus (Peperomia ringspot virus (PRSV)):
- Symptoms: Concentric brown rings, ring-shaped chlorotic patterns and distorted, puckered leaves; incurable and spread by handling and propagation.
- Treatment & Management: There is no cure—isolate and discard infected plants, sanitise tools and hands, and propagate only from clean stock.
Growing Difficulties & Abiotic Problems
- Overwatering and root rot:
- Cause & Symptoms: Soggy mix is the number-one cause of peperomia loss: roots suffocate and rot, leaves wilt, yellow and drop, and the base turns mushy.
- Correction Strategy: Use a light, free-draining mix, water only when the top of the soil dries, empty saucers, and repot the moment you see rot, removing affected tissue.
- Edema (oedema):
- Cause & Symptoms: Erratic watering—especially wet, cool, low-light conditions—makes cells burst and form corky raised bumps or scabs, mainly on leaf undersides.
- Correction Strategy: Water more evenly, increase light and airflow, and avoid watering in cool, dim conditions; damaged leaves won’t recover but new growth will be clean.
- Underwatering / low humidity:
- Cause & Symptoms: Very dry mix or air causes limp, curling or crisping leaves and dropped foliage.
- Correction Strategy: Water thoroughly when the surface dries, and provide moderate humidity; most peperomias tolerate average room humidity well.
- Cold and light stress:
- Cause & Symptoms: Cold draughts blacken or drop leaves, while too little light gives leggy, faded growth and too much direct sun scorches leaves.
- Correction Strategy: Keep above about 15°C away from draughts, and grow in bright indirect light, easing into any brighter position gradually.
What Helps — Products & Tools
Care is mostly cultural—light, airy mix and careful watering. Keep 70% rubbing alcohol, insecticidal soap and light horticultural oil for mealybugs, mites, whitefly, thrips and scale; yellow sticky traps and BTI for fungus gnats; and a copper-based fungicide for leaf spot. There is no treatment for ringspot virus—discard infected plants and keep tools clean.
Propagation Guide
Peperomia puteolata is most easily and reliably propagated from stem or leaf cuttings, which is also the only way to guarantee an identical, true-to-type plant, since seed-grown Peperomia are uncommon in cultivation. Propagation is easy for a home grower: cuttings root readily when given warm, humid, consistently moist conditions similar to the parent plant’s own preferences.
Quick Propagation Specs
| Best Propagation Method |
Stem or Leaf Cuttings |
| Propagation Difficulty |
Easy |
| Vegetative True-to-Type |
Yes — needed to keep the same cultivar |
| Best Propagation Season |
Spring through summer, during active growth |
| Cutting Rooting Time |
Not documented by the site; typically a few weeks under warm, humid conditions |
Stem Cuttings
Cutting Type
Stem cuttings taken from healthy, actively growing growth.
Cutting Preparation
Cut the stem cleanly, then let the cut end sit and heal in the shade for a few days before potting up.
Rooting Setup
Insert directly into soil once callused, and give the cutting the same warm (above 16°C/60°F, ideally 18–26°C/64–80°F), humid, evenly moist conditions the mature plant prefers.
Rooting Hormone
Not mentioned by the site; optional rather than required, since this species roots readily from cuttings.
Rooting Time
Not documented by the site; typically a few weeks under warm, humid conditions.
Leaf & Root Cuttings
Individual leaves can also be used: detach a leaf carefully by hand rather than cutting, taking care not to bruise or break it, then let the cut end heal in the shade for a few days before inserting it into soil. From there, treat it the same as a mature plant — warm, humid, and evenly moist — while it forms roots and eventually a new shoot.